How to add loco allocations to train services on Rail Record
Update December 2024:
Rail Record continues to offer user added allocations to workings but will now also start to show confirmed train allocations provided by train operating companies in the UK. You can search by train allocation on Rail Record for C2C trains and others will be added in due course.
Launch of the Rail Record members area is 2 months away from today. This is the third instalment of our weekly guide to using the members area, which will become available on Saturday 1st June 2019. This week, we will take a look at how you can add allocations to live train times schedules on Rail Record.
Why add allocations on Rail Record?
There are a number of good reasons why you should add allocations to train services. Some examples are:
- An allocation will be in your profile, so you can see what you’ve seen recently.
- Allocations are shown on the train schedule pages so will help people to know what is working what.
- Train allocations are also shown on the train’s information page, example at https://rail-record.co.uk/rail/loco?train=66738
- The above link shows you the information page for GBRf 66738, with user submitted information at the top, and recent allocation information at the bottom.
How to add an allocation on Rail Record live train times
Adding an allocation to train services is easy, and is possible in two ways.
Method 1:
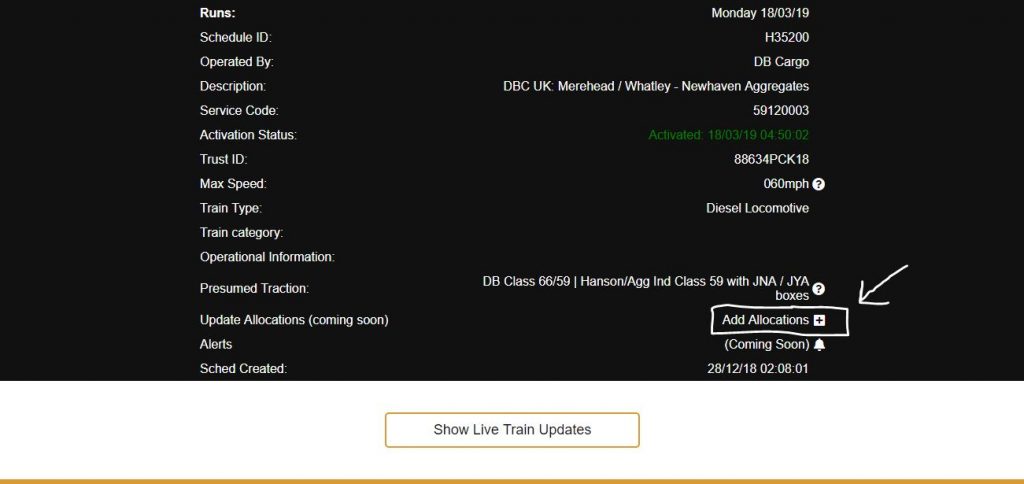
Find a schedule using the live train times feature, scroll down to the bottom, and click Add Allocation as shown on the screenshot below.

The white arrow shows the link to add an allocation. Press the + button to add a train allocation. If an allocation has already been added, it will be shown. You’ll have the opportunity to edit that allocation, or add another one.
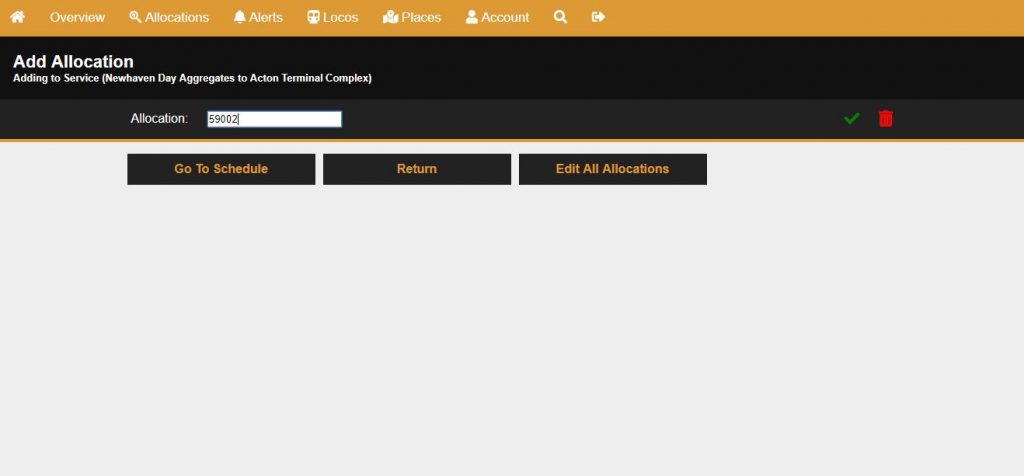
Once you press Add Allocation you will be taken to the members area where you can add it. If you’re not already logged in, you’ll be prompted to do so. A soon time later, you’ll see the Add Allocation page, like the below.

Here, you can enter the sighted allocation. Press the green tick to add the sighted locomotive or unit. You will then be taken to a confirmation page. If your input wasn’t valid, you’ll receive a message why.
Method 2:
You can search for a train service by headcode, or by train number, on the allocations page, accessible from the main menu inside the members area. Type a headcode (real if available, otherwise it will need to be the obfuscode), or the train number, to see a list of results. Click the + button on the right, or if there is already an allocation present, you can edit it.
When adding an allocation, please:
- Do not include spaces. Just enter the unit number, EG 377342, or DR98951 if it is plant.
- If it is a locomotive running in the guise of another, please just enter the number of what the train actually is. Don’t include 2 numbers seperated by slashes or brackets.
- There is a limit to 7 characters. This should be enough. Don’t add names in the allocation field. Train names can be added on the train information page, which we will share next week.
Once you’ve added the allocation, you’ll arrive at the confirmation page where you can then either edit your allocation, edit all allocations for that working, or go to schedule where you’ll be taken back to the schedule page.
We hope this guide has been useful. Join us next week when we take a look at adding information to a Train Information page where you can add things like names, liveries and pool codes.
[…] week we explained how to add allocations to train services. This week we will discover how you can add information to these trains which have been allocated. […]
I don’t have the allocations section on my account, although I’ve signed up